
·
7 min read
Custom code blocks are essential for my blog as my articles usually contain a lot of code snippets. My blog is powered by Nuxt Content v2, which is a Nuxt 3 module. I already wrote an article about how you can create custom code blocks using Nuxt Content v2.
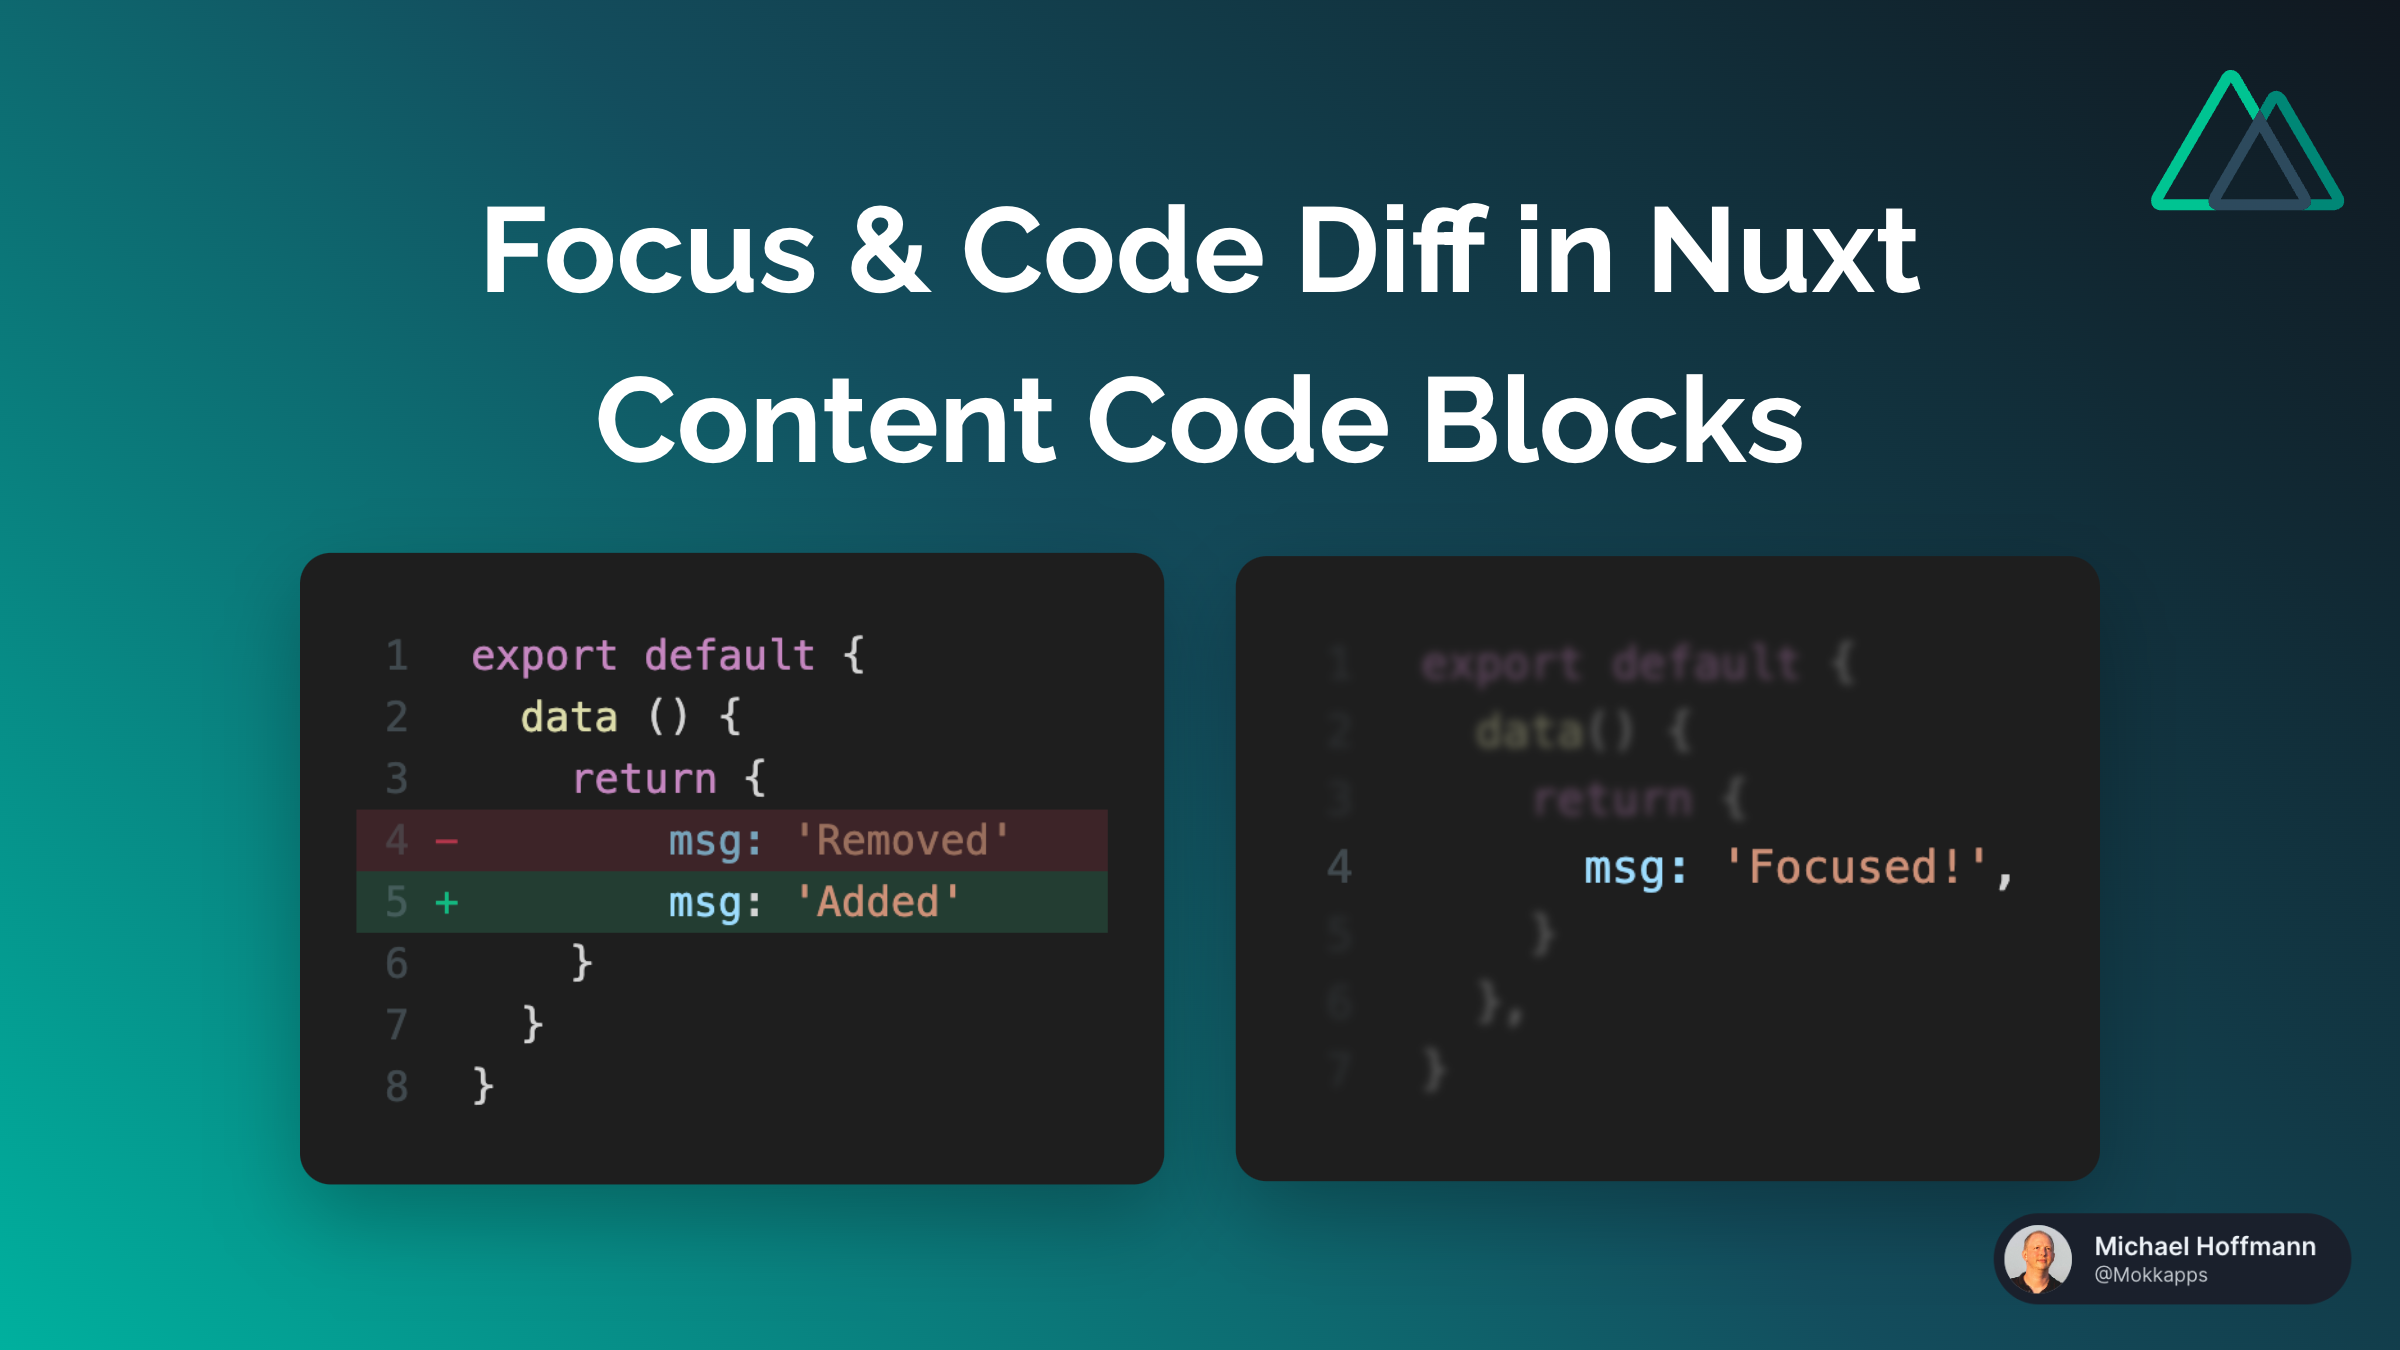
In this article, I'll show you how to focus certain lines of your code or highlight a diff inside a custom code block. This feature is adopted from Vitepress which provides similar functionality.
Focus Lines
Sometimes, you want to focus on certain lines of your code. For example, you want to highlight the most important lines of your code snippet.
In our example, we can do this by adding // [!code focus] in the line that should be highlighted:
1```js [focus.js]
2export default {
3  data() {
4    return {
5      msg: 'Focused!', // [!code  focus]
6    }
7  },
8}
9```
The above code results in the following code block:
focus.js
1export default {
2  data() {
3    return {
4      msg: 'Focused!', // [!code focus]
5    }
6  },
7}
If you hover over the code block, you can see that the whole code is visible without any highlighting.
Diff Lines
Another use case is to highlight a diff inside a code block. For example, you want to show the difference between two code snippets.
In our example, we can do this by adding // [!code ++] in the line that should be highlighted as added and // [!code --] in the line that should be highlighted as removed:
1```js [diff.js]
2export default {
3  data () {
4    return {
5      msg: 'Removed' // [!code  --]
6      msg: 'Added' // [!code  ++]
7    }
8  }
9}
10```
The above code results in the following code block:
diff.js
1export default {
2  data () {
3    return {
4      msg: 'Removed' // [!code --]
5      msg: 'Added' // [!code ++]
6    }
7  }
8}
Implementation
Info
Update from January 2024: The following implementation is only necessary if you don't use shikiji, which provides transformers for the focus and diff syntax.
Let's now take a look at the implementation of this feature.
We opt out of the default code highlighting provided by Nuxt Content and handle it ourselves. We use Shiki to highlight the code, which is also used by Nuxt Content under the hood. The process of custom rendering of code blocks is documented in the Shiki README.
Let's start by writing a composable that returns a Shiki highlighter instance. As we'll have multiple Shiki instances on the same page we need to make sure that we only create one instance and reuse it. This is achieved by putting the highlighter instance in a ref outside of the composable.
Additionally, the composable exports the renderToHtml function from Shiki which we use later to render the highlighted code to HTML:
composables/useShikiHighlighter.ts
1import { getHighlighter, Highlighter, renderToHtml } from 'shiki-es'
2
3const highlighter = ref<Highlighter | null>(null)
4
5export const useShikiHighlighter = () => {
6  if (highlighter.value === null) {
7    getHighlighter({
8      theme: 'dark-plus',
9      themes: ['dark-plus'],
10      langs: ['css', 'scss', 'js', 'ts', 'groovy', 'java', 'diff', 'vue', 'html', 'json', 'xml'],
11    }).then((_highlighter) => {
12      highlighter.value = _highlighter
13    })
14  }
15
16  return { highlighter, renderToHtml }
17}
Now it's time to create the custom code block component.
Info
If you never did this before, I'd recommend you to read my article about how to create a custom code block with Nuxt Content v2 first.
The basic structure of our custom ProseCode component looks like this:
components/content/ProseCode.vue
1<script setup lang="ts">
2interface Props {
3  code?: string
4  language?: string | null
5  filename?: string | null
6  highlights?: Array<number>
7}
8const props = withDefaults(defineProps<Props>(), {
9  code: '',
10  language: null,
11  filename: null,
12  highlights: () => [],
13})
14</script>
15
16<template>
17  <div class="mb-8 mt-4 rounded-md bg-[#1e1e1e]">
18    {{ code }}
19  </div>
20</template>
Let's extend that component by using our useShikiHighlighter composable to highlight the code:
components/content/ProseCode.vue
1<script setup lang="ts">
2// ...
3
4const html = ref(null)
5const shiki = useShikiHighlighter()
6
7watch(
8  shiki.highlighter,
9  (newHighlighter) => {
10    if (!newHighlighter || !props.code) {
11      return
12    }
13    const tokens = newHighlighter.codeToThemedTokens(props.code.trim(), props.language ?? undefined)
14    html.value = shiki.renderToHtml(tokens, {
15      fg: newHighlighter.getForegroundColor('dark-plus'),
16      bg: newHighlighter.getBackgroundColor('dark-plus'),
17      // custom element renderer
18      elements: {
19        pre({ className, style, children }) {
20          return `<pre tabindex="1" class="${className} bg-[#1e1e1e] style="${style}">${children}</pre>`
21        },
22        code({ children, className, style }) {
23          return `<code class="${className}" style="${style}">${children}</code>`
24        },
25        line({ className, index, children }) {
26          return `<div class="${className} w-full inline-flex">
27                    <div>${children}</div>
28                  </div>`
29        },
30      },
31    })
32  },
33  { immediate: true }
34)
35</script>
36
37<template>
38  <div class="mb-8 mt-4 rounded-md bg-[#1e1e1e]">
39    <div v-if="html" v-html="html"></div>
40    <span v-else>{{ code }}</span>
41  </div>
42</template>
Let's go through the code step by step:
- We create a
htmlref that will contain the highlighted code as HTML - We use the
useShikiHighlightercomposable to get the highlighter instance and therenderToHtmlfunction - We watch the
highlighterref and callrenderToHtmlwhen the highlighter is available - We use the
codeToThemedTokensfunction to get the tokens for the code - We use the
renderToHtmlfunction to render the tokens to HTML - We use the
elementsoption to customize the HTML output of the code block. Thelineelement can be used to customize the HTML output of each line. We use it to add adivaround each line to make it possible to highlight single lines. - We use the
v-htmldirective to render the highlighted code as HTML
You can now easily extend the code to highlight lines if certain comments are inside the code passed via props:
components/content/ProseCode.vue
1<script setup lang="ts">
2// ...
3
4const html = ref(null)
5const shiki = useShikiHighlighter()
6
7const removeCodeBlockIdentifiers = (code: string) => {
8  return code
9    .replace(codeBlockIdentifiers.FOCUS, '')
10    .replace(codeBlockIdentifiers.DIFF_ADD, '')
11    .replace(codeBlockIdentifiers.DIFF_REMOVE, '')
12}
13
14const codeBlockIdentifiers = {
15  FOCUS: '// [!code  focus]',
16  DIFF_ADD: '// [!code  ++]',
17  DIFF_REMOVE: '// [!code  --]',
18} as const
19
20const moreThanOneLineCode = computed(() => (props.code ? props.code.trim().split('\n').length > 1 : false))
21
22watch(
23  shiki.highlighter,
24  (newHighlighter) => {
25    if (!newHighlighter || !props.code) {
26      return
27    }
28    const tokens = newHighlighter.codeToThemedTokens(props.code.trim(), props.language ?? undefined)
29    html.value = shiki.renderToHtml(tokens, {
30      fg: newHighlighter.getForegroundColor('dark-plus'),
31      bg: newHighlighter.getBackgroundColor('dark-plus'),
32      // custom element renderer
33      elements: {
34        pre({ className, style, children }: any) {
35          const shallFocus = props.code.includes(codeBlockIdentifiers.FOCUS)
36          const hasDiff =
37            props.code.includes(codeBlockIdentifiers.DIFF_ADD) || props.code.includes(codeBlockIdentifiers.DIFF_REMOVE)
38
39          return `<pre tabindex="1" class="${className} bg-[#1e1e1e] ${shallFocus ? 'has-focused-lines' : ''} ${
40            hasDiff ? 'has-diff' : ''
41          }" style="${style}">${children}</pre>`
42        },
43        code({ children, className, style }) {
44          return `<code class="${className}" style="${style}">${children}</code>`
45        },
46        line({ className, index, children }: any) {
47          const shallHighlight = props.highlights?.includes(index + 1) ?? false
48          const shallFocus = children.includes(codeBlockIdentifiers.FOCUS)
49          const shallDiffRemove = children.includes(codeBlockIdentifiers.DIFF_REMOVE)
50          const shallDiffAdd = children.includes(codeBlockIdentifiers.DIFF_ADD)
51          const modifiedChildren = removeCodeBlockIdentifiers(children)
52
53          let beforeElement = '<div class="ml-4"></div>'
54          if (shallDiffAdd) {
55            beforeElement = `<div class="ml-4 mr-6 text-[#738a9466]">${
56              index + 1
57            } <span class="text-[#10b981]">+</span></div>`
58          } else if (shallDiffRemove) {
59            beforeElement = `<div class="ml-4 mr-6 text-[#738a9466]">${
60              index + 1
61            } <span class="text-[#f43f5e]">-</span></div>`
62          } else {
63            beforeElement = `<div class="ml-4 mr-6 text-[#738a9466]">${index + 1}</div>`
64          }
65
66          return `<div class="${className} ${shallHighlight ? 'bg-[#363b46]' : ''} ${shallFocus ? 'has-focus' : ''} ${
67            shallDiffRemove ? 'diff remove' : ''
68          } ${shallDiffAdd ? 'diff add' : ''} w-full inline-flex">
69                    ${beforeElement}
70                    <div>${modifiedChildren}</div>
71                  </div>`
72        },
73      },
74    })
75  },
76  { immediate: true }
77)
78</script>
79
80<style scoped lang="scss">
81:deep(pre) {
82  > code {
83    & .line.diff.remove {
84      background-color: rgba(244, 63, 94, 0.2);
85      opacity: 0.7;
86    }
87    & .line.diff.add {
88      background-color: rgba(16, 185, 129, 0.2);
89    }
90  }
91}
92
93:deep(pre.has-focused-lines) {
94  > code {
95    & .line:not(.has-focus) {
96      filter: blur(0.095rem);
97      opacity: 0.4;
98      transition: filter 0.35s, opacity 0.35s;
99    }
100  }
101}
102
103:deep(pre.has-focused-lines:hover) {
104  > code {
105    & .line:not(.has-focus) {
106      filter: blur(0);
107      opacity: 1;
108    }
109  }
110}
111</style>
The idea is quite simple: We look for our predefined set of comments inside the code and add a custom class to the line if the comment is present. We can then use this class to style the line accordingly.
Of course, you also need to remove these comments from the code before passing it to the codeToThemedTokens function. Otherwise, the comments would be rendered as HTML.
StackBlitz Demo
The code for this article is interactively available on StackBlitz:
Conclusion
In this article, you learned how to use the Nuxt content module to render code blocks that highlight single lines or highlight lines that were added or removed. By opting out of the default code highlighting of the Nuxt content module, you can use the Shiki library to render any custom code block that you need.
I like such small customizations that can make a big difference in the user experience. I hope you enjoyed this article and learned something new.
If you liked this article, follow me on Twitter to get notified about new blog posts and more content from me.
Alternatively (or additionally), you can subscribe to my weekly Vue newsletter:
Lazy Load Vue Component When It Becomes Visible
In this blog post, I'll show you how a simple mechanism to lazy load your Vue components if they become visible using the Intersection Observer API.
Unlocking the Power of v-for Loops in Vue With These Useful Tips
Looping through arrays and objects is a common task in Vue applications. The v-for directive is the perfect tool for this job. It is mighty, and you can use it in many different ways. In this article, I will show you some valuable tips and tricks to get the most out of the v-for directive.